Task scheduling with Cron job in Laravel applications requires some tasks to be run periodically on the server. It could be sending advertisement emails, optimizing the database, deleting the logs or creating backups, or generating the site traffic report. To automate these tasks, a task scheduling system is required. Laravel Cron Job deals with an elegant Task Scheduling mechanism.
Cron
Cron is a time-based task scheduler in Unix/Linux operating systems. It runs shell commands at a pre-specified time period. Cron uses a configuration file called crontab also known as the Cron table to manage the task scheduling process.
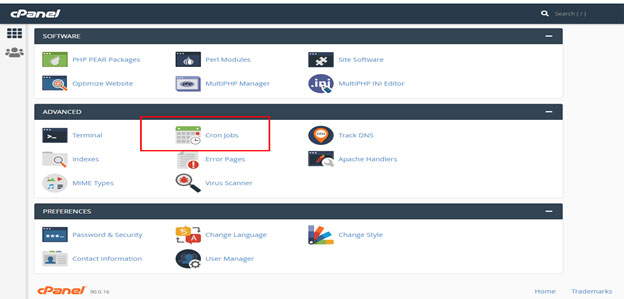
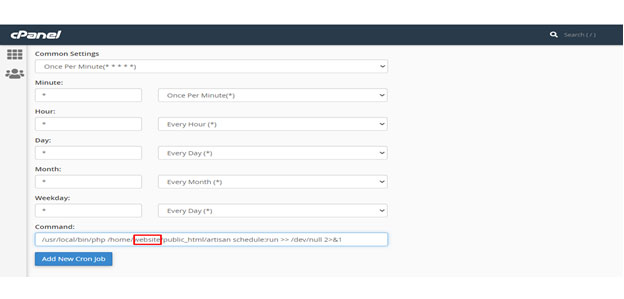
In the Cpanel Hosting, there is an option of cron you can set it from here.


In the Cron expression above (* * * * *), each field is an option for determining the task schedule frequency. I have set this option according to my need. You can set these options according to your needs it represents the minute, hour, day of the month, month, and day of the week in the given order. Asterisk symbol means all possible values. So, the above command will run every minute.[/vc_column_text]
Laravel Cron Job is a built-in task manager that provides the ability of your applications to execute specific commands like sending a slack notification or removing inactive users at a periodic time or backup the database etc. We will be using the latest version of Laravel 8, which is at the time of writing this article.
You need a Linux Operating System to run Cron Jobs. This tutorial also assumes a reasonable knowledge of PHP and Laravel.
Creating a new Project
If you have already installed the Laravel project skip this step.
In this tutorial, we will create a simple laravel application to show task scheduling. Create a new Laravel project by running the following command.
composer create-project –prefer-dist laravel/laravel cron
Create your Scheduled Task in Laravel
There are multiple ways you can define scheduled tasks in laravel. Let’s go through each of them to understand how they can be applied in Laravel.
- Create New Artisan Command
Open a command prompt and got to your project directory and run the following command to create a new artisan command class:
php artisan make:command WordOfTheDay
The above command will create a new command file, WordOfTheDay.php, in the app/Console/Commands directory. Navigate to the file and you will find the following code in it:
<?php

namespace App\Console\Commands;

use Illuminate\Console\Command;

class WordOfTheDay extends Command
{
    /**
     * The name and signature of the console command.
     *
     * @var string
     */
    protected $signature = 'command:name';

    /**
     * The console command description.
     *
     * @var string
     */
    protected $description = 'Command description';

    /**
     * Create a new command instance.
     *
     * @return void
     */
    public function __construct()
    {
        parent::__construct();
    }

    /**
     * Execute the console command.
     *
     * @return mixed
     */
    public function handle()
    {
        //
    }
}
In this code, the following line contains the name and the signature of the command.
protected $signature = ‘command:name’;
Replace the words command:name with word:day. This is what we will call this when running the command to perform the task.
protected $signature = ‘word:day’;
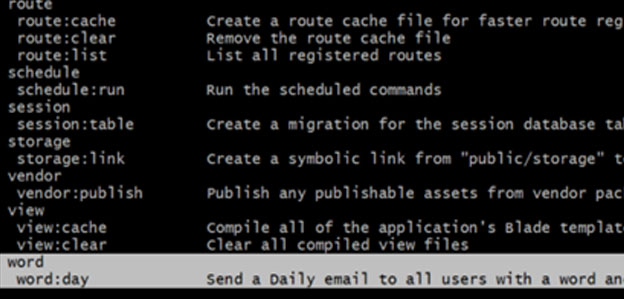
The above code contains the description property you can change it and write a proper description of what this command will do. This Description will be shown when the Artisan list command is executed alongside the signature.
Change the description of the command to:
protected $description = ‘Send a daily email to all users with a word and its meaning’;
The handle function is called whenever the command will be executed. This is where we place the code for doing the specific task. This is how the WordOfTheDay.php file looks with the handle method and all other changes in place:
<?php
namespace App\Console\Commands;
use App\User;
use Illuminate\Console\Command;
use Illuminate\Support\Facades\Mail;
class WordOfTheDay extends Command {
/** * The name and signature of the console command. * * @var string */
protected $signature = 'word:day';
/** * The console command description. * * @var string */
protected $description = 'Send a Daily email to all users with a word and its meaning';
/** * Create a new command instance. * * @return void */
public function __construct() {
   parent::__construct();
}
/** * Execute the console command. * * @return mixed */
public function handle() {
    $words = [
             'aberration' => 'a state or condition markedly different from the norm',
            'convivial' => 'occupied with or fond of the pleasures of good company',
            'diaphanous' => 'so thin as to transmit light',
            'elegy' => 'a mournful poem; a lament for the dead',
            'ostensible' => 'appearing as such but not necessarily so'
        ];

        // Finding a random word
        $key = array_rand($words);
        $value = $words[$key];

        $users = User::all();
        foreach ($users as $user) {
            Mail::raw("{$key} -> {$value}", function ($mail) use ($user) {
                $mail->from('info@tutsforweb.com');
                $mail->to($user->email)
                    ->subject('Word of the Day');
            });
        }

        $this->info('Word of the Day sent to All Users');
    }
}
The above code will pick a random word from the array and send emails to every user with the word.
- Registering the Command
Now you need to register a command which you have created above.
Go to app/Console/Kernel.php file that looks like this
<?php
namespace App\Console;
use Illuminate\Console\Scheduling\Schedule;
use Illuminate\Foundation\Console\Kernel as ConsoleKernel;
class Kernel extends ConsoleKernel {
     /** * The Artisan commands provided by your application. * * @var array */
protected $commands = [ // ];
/** * Define the application's command schedule. * * @param \Illuminate\Console\Scheduling\Schedule $schedule * @return void */
protected function schedule(Schedule $schedule) {
      // $schedule->command('inspire')
        //          ->hourly();
    }

    /**
     * Register the commands for the application.
     *
     * @return void
     */
    protected function commands()
    {
        $this->load(__DIR__.'/Commands');

        require base_path('routes/console.php');
    }
}
In this file, we register the command class in the commands property. If you did not add anything in the kernel.php file then you can replace it from the below code otherwise you can update the code in your kernel.php file according to the below code.
<?php
namespace App\Console;
use Illuminate\Console\Scheduling\Schedule; use Illuminate\Foundation\Console\Kernel as ConsoleKernel;
class Kernel extends ConsoleKernel {
protected $commands = [ Commands\WordOfTheDay::class, ];
protected function schedule(Schedule $schedule) {
$schedule->command('word:day')
            ->daily();
    }

    protected function commands()
    {
        $this->load(__DIR__.'/Commands');

        require base_path('routes/console.php');
    }
}
Now the code is ready for execution if you run the php artisan list command in the terminal, you will see your command has been registered. You will be able to see the command name with the signature and description.

Setup, database, and mail credentials in the .env file and make sure you have users in the database. Execute the command itself on the terminal:
php artisan word:day
Command will be executed with the signature that is placed in a protected $signature = ‘command:name’. You will also see the log message in the terminal.
Setup, database and mail credentials in the .env file and make sure you have users in the database. Execute the command itself on the terminal:
php artisan word:day
Command will be executed with the signature that is placed in protected $signature = ‘command:name’. You will also see the log message in the terminal.

Task Scheduling Cron Job Laravel
Task Scheduler in Laravel executes the artisan command, shell, or a callback periodically on the defined time. To do this, we use the schedule method in app/Console/Kernel.php as we discussed earlier.
protected function schedule(Schedule $schedule)
{
    $schedule->command('word:day')
        ->daily();
}
$schedule->command(‘word:day’) is where we define which command needs to be executed and ->daily(); defines the frequency of execution. There are some more time intervals that we can define like hours(), day(), etc. You can replace ->daily(); with another time interval option from the following list. You can also find details of task scheduling for the interval in Laravel Documentation.
Starting the Laravel Scheduler
Let’s set up the Cron Jobs to run automatically without starting manually by running the command. I have written at to top of cron section where clearly define how to start and setup cron job at the server.
To start the auto Laravel Schedule, we only need to add one Cron job which executes every minute.
There are several advantages of the Laravel task scheduler but the most important advantage of Laravel Task Scheduler is that we can focus on creating commands and writing business logic and Laravel will take care of the rest.


